

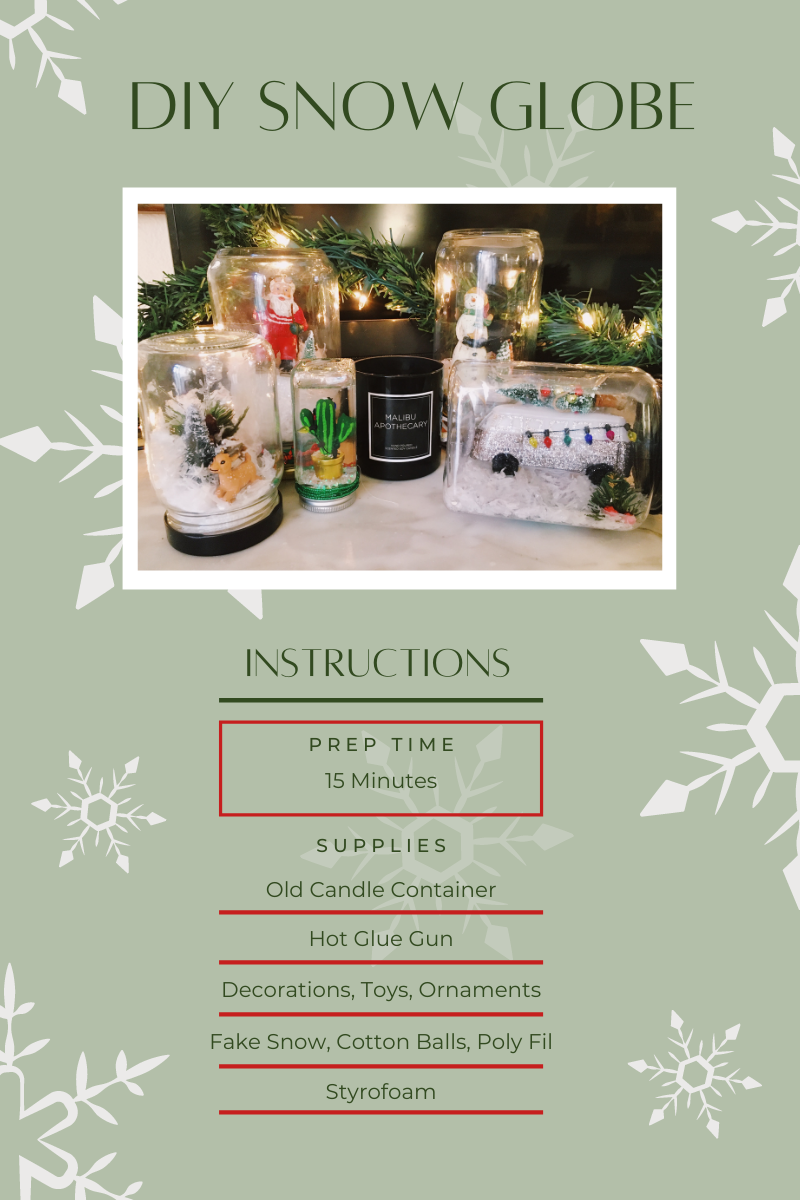
How to Make Snow Globes With Old Candle Jars
Looking for an easy and creative way to reuse your old candle containers? Give your candle a new home with this fun DIY snow globes! These make great homemade holiday gifts or holiday home decor! We will walk you through how to remove the wax from your container and how to turn your old jar new with snow globes you can give as gifts or perfect for your mantle!

Step 1: Gather Supplies
For this project you will need the following supplies:
- Candle Container
- Styrofoam
- Fake Snow, "Frosty Snow", Cotton Balls or Poly-Fil Stuffing
- Toys, Ornaments, or Figurines
- Hot Glue Gun
Tis' the season for DIY, repurposing old stuff around your home, and shopping local. Most of these items can either be found around your house or at your local craft store. We used ornaments and toys we found at a nearby vintage store. You can also use any old or extra ornaments you may have.
Step 2: Removing Old Candle Wax
If you are a candle addict like us, you will most likely have a lot of odd candle jars lying around. First, you will want to remove the existing wax from your container. You can check out our blog How to Remove Candle Wax for a more in-depth guide but you can start to do this by using one of three methods: freezing, washing, or boiling.
FREEZING CANDLE WAX:
Place your candle jars in the freezer for a few hours. This allows the wax to harden and should make it easier to use a knife to pick out the contents. You can clean any remaining wax or residue with a warm, wet paper towel. Although this is probably the simplest method, it works better for harder waxes like paraffin or beeswax.
WASHING YOUR CANDLE CONTAINER:
First, clean as much of the wax out of the container as you can with a knife. Next, you should use hot water and soap to clean the residue. This works best for softer and more natural waxes like ours with coconut and soy. We recommend using paper towels for easy cleanup. This method probably takes the most time, and you want to be careful not to get too much of the wax down your pipes.
DOUBLE BROILER METHOD:
The doubler boiler method works well for hard waxes that are stuck on your candle jar. You will simply place your candle container in a pot of boiling water to soften the wax from all sides. Once the wax has softened, carefully take the jar out and pour out the remaining liquid wax.
WARNINGS:
- Don't overheat the glass
- Do not put any solid or liquid wax down the sink as this will clog your drains
- Do not use a microwave as many wicks are set with a metal clip at the bottom and can cause a fire
- Careful not to break the glass
Step 3: Remove Candle Label
You can do this by soaking the jar in hot water with dish soap. A heat gun or hair dryer will help in getting off the extra goo or residue left on the container. Try also window or glass container for a nice shined finish.

Step 4: Cut & Trace Your Styrofoam
Get your piece of styrofoam and trace the opening of the candle jar for the right dimensions.

Step 5: Glue Your Decorations & Styrofoam Base
Take your piece of cut styrofoam and hot glue it to your candle lid. Then take your ornaments, toys, figurines, and decorations and hot glue it to the styrofoam base.
We went to our local antique store for these.
You can even take cotton balls to glue around your ornaments for extra fluff or snow.
Wait for this to properly dry before continuing on to Step 7.

Step 6: Fill your Candle Container With Fake Snow
Take your bag of fake snow and fill your candle container about 3/4 inches. We purchased Frosty Snow from Walmart but it should be available at your local craft store.

Step 7: Add Your Lid & Shake Your New Candle Snow Globe!
Once your ornaments have dried on your lid, take your lid and add it back to the container. Now shake it up for your new DIY winter wonderland!
These are great and inexpensive ways to not only reuse your old containers but to add to your holiday decor or as holiday presents!
Tag us in your holiday creations @malibuapothecary!
Read more
You may have heard of Phthalates and their inclusion in our everyday products, but what are they? We will break down what Phthalates are, their purpose, and why they can be harmful to you. Accordin...
The truth behind synthetic fragrances. When I tell people that our fragrances our clean, I find most don’t even know what that means. In an industry riddled with big players and small homemakers, t...
Leave a comment
All comments are moderated before being published.
This site is protected by hCaptcha and the hCaptcha Privacy Policy and Terms of Service apply.