

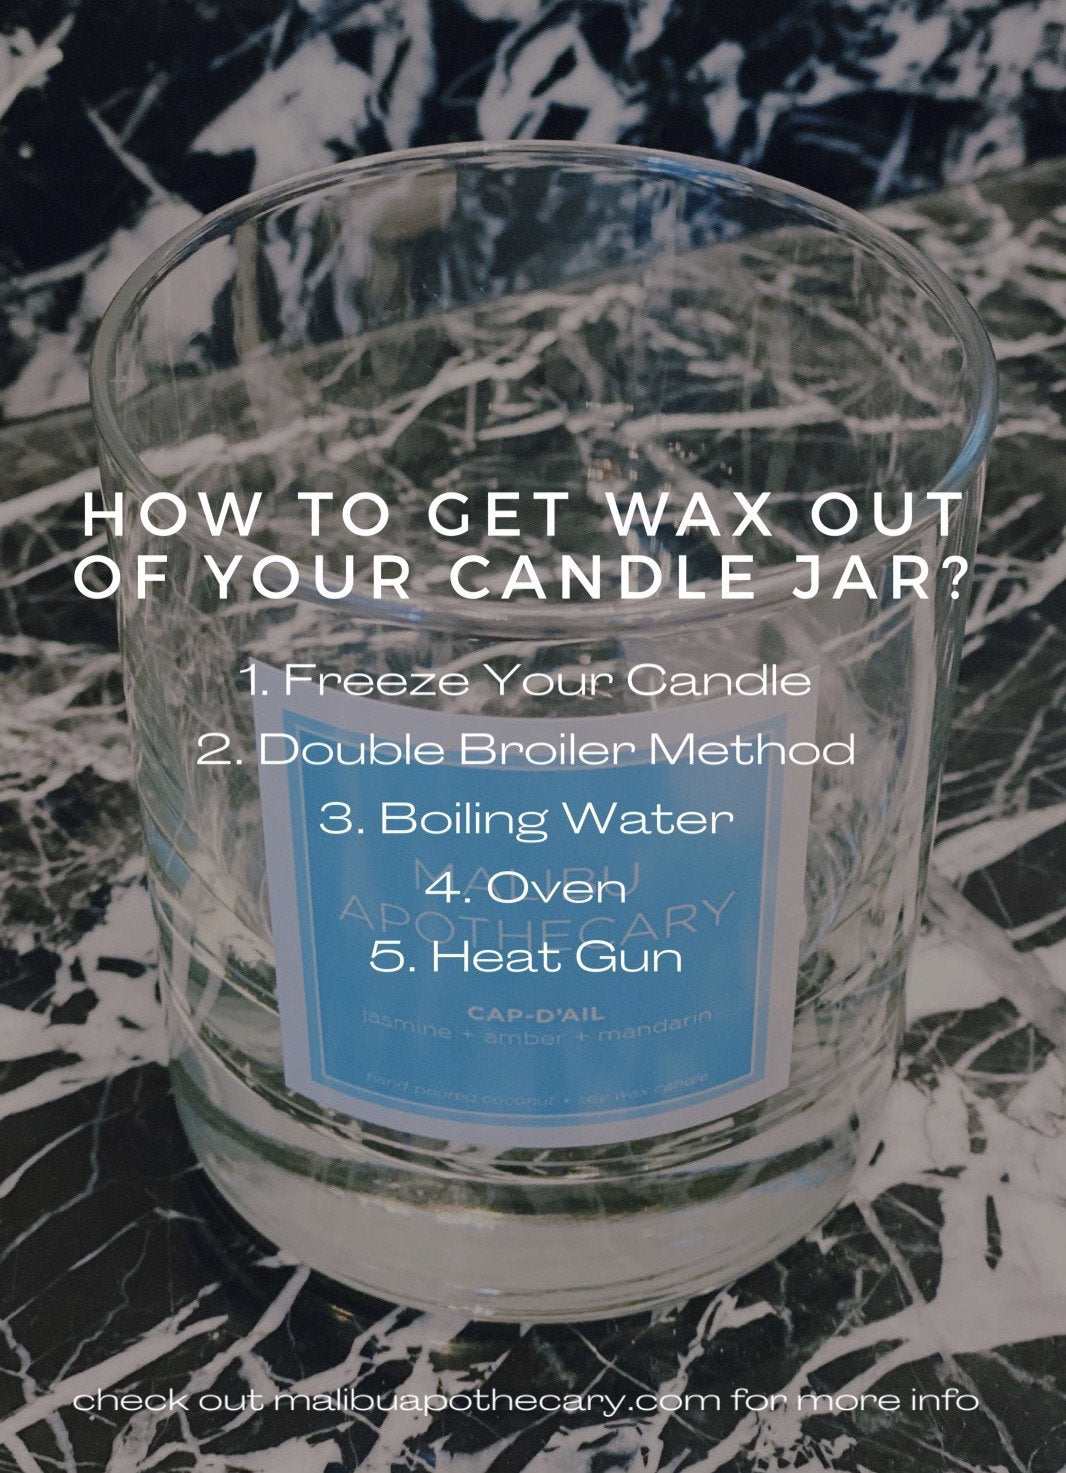
How To Get Wax Out of a Candle Jar?
Your scented escape has concluded with your destination-inspired candle. You must pack your bags and go home. But - you get to take home a souvenir! Let your container discover the afterlife by removing your candle wax, getting rid of the label, and trying new ways to repurpose your jar with this guide!

How To Get Wax Out of a Candle Jar?
Don't let pesky wax get in the way of reusing your beautiful vessel. Try one of our easy methods to quickly removing your clean coconut wax from your candle jars.
Be sure for safety's sake to follow these warnings before doing any of the below.
FOR SAFETY'S SAKE:
- Don't overheat the glass
- Do not put any solid or liquid wax down the sink as this will clog your drains
- Do not use a microwave as many wicks are set with a metal clip at the bottom and can cause a fire
- Careful not to break the glass
Five Ways to Remove Candle Wax from the Container:
1. Freeze:
- Freeze your old burn babies. Try placing your candle in the freezer for a few hours to remove the wax. This method is best for candles at the end of their life, with only about an inch of wax left. Since wax shrinks when it freezes (unlike water) it allows the wax to separate from the edge of the jar. This makes it extra easy to pop out with a knife. If the wax isn’t coming out, try keeping it a little bit longer and try again. Otherwise, use one of our other three methods below.
2. Double Broiler Method:
- The double boiler method works best for softer wax candles like soy or coconut. This is due to their low melting point. However, this is not ideal if you want to keep the label on your candle as it will cause water damage. Place your candle into a large empty pot or bowl and pour the hot water into the container around the candle. Once the wax begins to soften around the edges, you can pop out the wax with a knife.
3. Boiling Water:
- This method is better for those who want to maintain the integrity of the label. You can use boiling water to remove the wax. Make sure to protect the surface you set your candle down on. You can use paper or bath towels to make sure not to leave heat damage or avoid water spills and residue. Pour the boiling water into the container. You will see the wax begin to melt and rise to the surface. Once the water has cooled and the wax has hardened again, remove the wax and pour the water out
4. Oven:
- Perfect for pairs, use this method when you have more than one candle to repurpose. Preheat your oven to 150-200°F. Place your candle(s) upside down on a sheet of aluminum foil on a baking pan. You can set the candle in the oven for about 12-15 minutes while staying in sight. Carefully remove the pan from the oven and using an oven mitt, take your vessels off of the pan. Pro Tip: Don't overcrowd the pan or it will cause the wax to overflow from the pan and drip inside your oven. (If this happens, use an ice cube to freeze off the wax and cut out in chips).


5. Heat Gun:
- Masters and DIY-ers only. If you have one, you can use a heat gun to remove any old wax stubborn or not from your container. Be careful and be sure not to wear any rubber or plastic gloves as they can melt on your hand from the heat. If you have less than 1/4 inch of candle wax left, you can keep the candle right-side up and melt the wax. Make sure it is on a safe surface and one where the heat will not damage it. When it is liquefied, you can just use a paper towel to remove the excess. If you have more than 1/4 inch of wax left, you can use a sheet of aluminum foil on a baking pan, turning the candle over, and using the gun until the wax has melted. If there is a lot of wax left, make sure to do this in stages and not let the glass overheat, as it may break.
Once you have successfully melted and removed your wax, you can wipe it out with a paper towel while the glass is still warm. Make sure you have removed your wick. Our candles do not use any glue or additives to keep the wick in place so it should come out with any of the methods listed about. For any stubborn residue, you can moisten your paper towel with hot warm and dab of dish soap to wash off the wax.
How to Remove Labels from Candle Jars
We won't be offended if you rip off our label. Just make sure you follow this guide and do it right. Try one of these four ways to remove your stickers from your scented candles:
- Try using a hairdryer to heat the edges of the label and loosen the grip of the sticker glue from the glass. While the sticker is warm, try peeling from the edges. If the label starts to break in half or if any residue remains. Stop and try one of the other options below.
- Submerge your candle in a sink or pot of hot water and dish soap. Keep it here for at least 10 minutes. If the label isn't loose, wait some more or This should take care of your label but if not, you can add a tablespoon of white vinegar if needed.
- Grab a large pot that you can submerge your candle holder in fully. Fill the pot with water and baking soda or liquid dish soap. Place your pot on the stove bringing the water to simmer and allow it to steep. The label should dissolve off the glass on its own.
- If residue remains, try scrubbing with baking soda

How to Reuse Candle Jars
If you didn't see our article on ways to repurpose your candle jars, we have listed some easy ways to breathe life back into these beauties:
- Freshen up your space with a new flower vase
- Store your matches
- Jewelry holder
- Reuse as a tealight holder
- A new cocktail glass. (Try using it for one of our coastal cocktail recipes!)
- Plant small house plants like succulents
- Office supply holder for pencils, scissors, rubber bands, and more
- Your new makeup brush holder
- Fancy q-tip storage (use your candle lids for premium storage and stacking)
- Get creative and store your paintbrushes or art supplies in these jars
Read more
Was it love at first light? Great! Now let's get to know each other a little better. Here is your ultimate guide to properly burning your candles so you can get lit and not burned. We will teach yo...
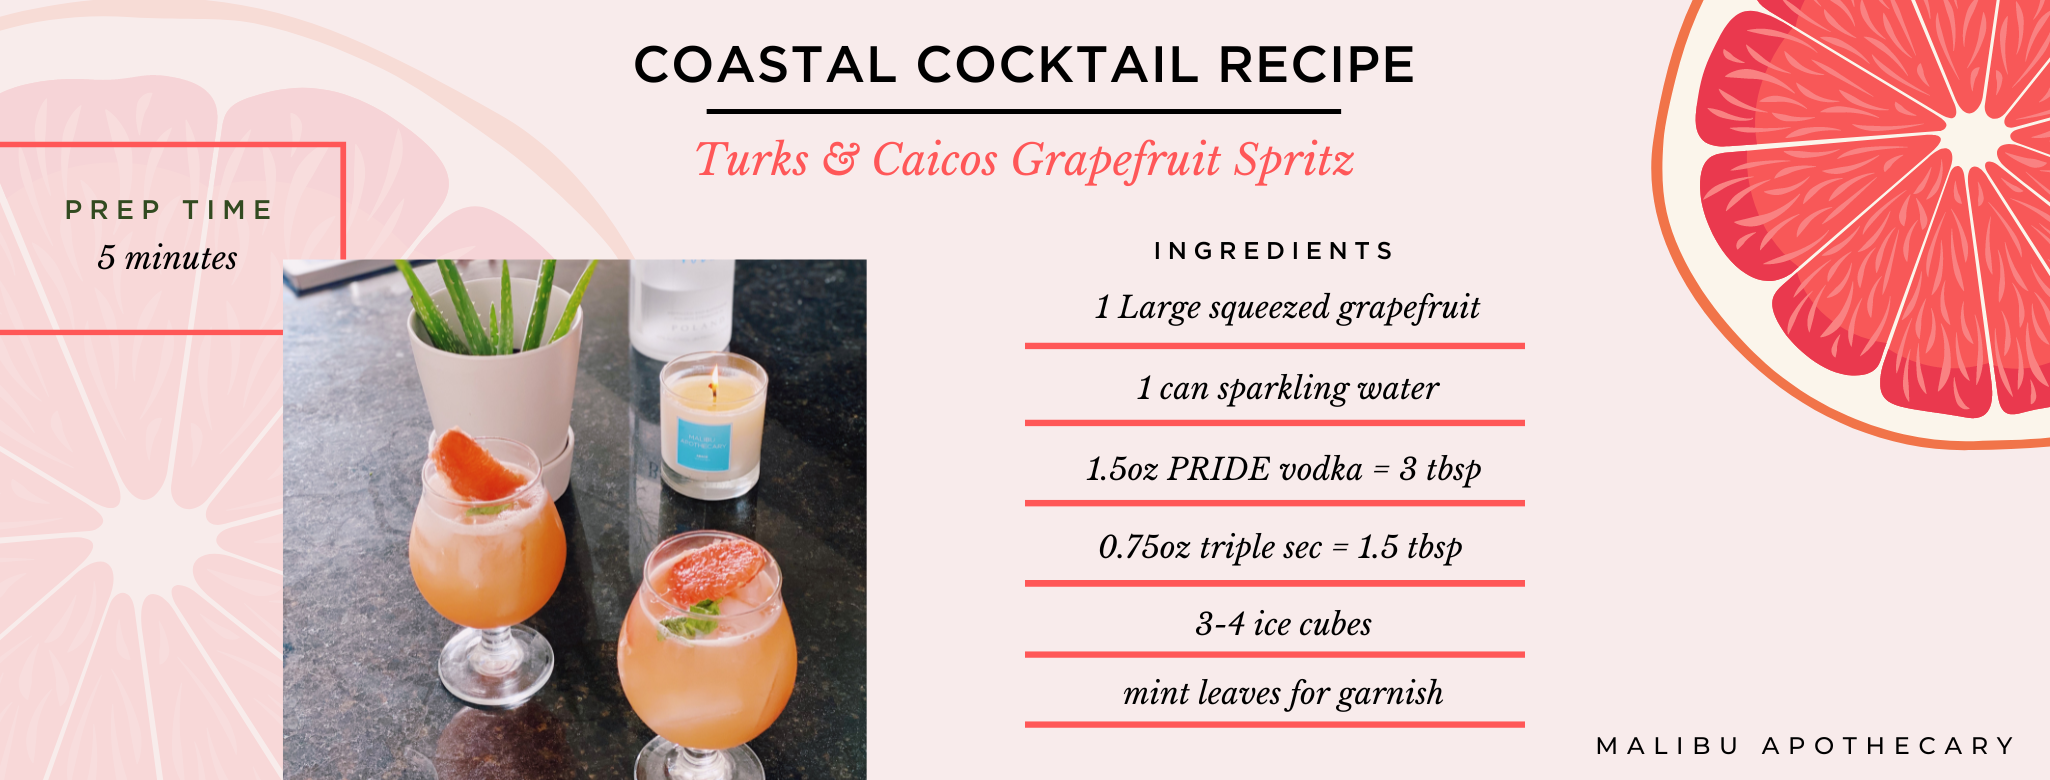
This spritzer will be your new fresh favorite, sure to take you to the turquoise waters of TCI. If you like grapefruit you will like this one infused with PRIDE vodka that supports organizations th...
1 comment
Other uses: turn into a snow globe, using the lid as the bottom!
Label remover: use goo-gone or skin so soft. With both, I add to a paper towel and lay it on the label for an hour and the label and glue seems to come right off.
other uses
kathryn kohler
Leave a comment
All comments are moderated before being published.
This site is protected by hCaptcha and the hCaptcha Privacy Policy and Terms of Service apply.